Last week I covered the Routing Tab in my X32-Mix App Tutorial series, if you haven’t seen the blog post, check it out here: X32-Mix App Tutorial Routing Tab. This week we look into the ‘Monitor’ tab of X32-Mix.
X32-Mix App Tutorial Monitor Tab
The Monitor Tab is going to be really useful for those of you who are mixing solely from the iPad. I would recommend getting a set of in-ear monitors like the Sennheiser EW 300 IEM G3 or the Shure PSM series. Once you get these, plug them into the ‘Monitor/Control Room Out’ on the back of the X32. This will give you the ability to monitor and solo items from the iPad but listen to them while you are not physically next to the console.
When we click on the X32-Mix App Monitor section, we have 4 tabs, Monitor, Talkback A, Talkback B, and Oscillator.
X32-Mix Monitor Tab
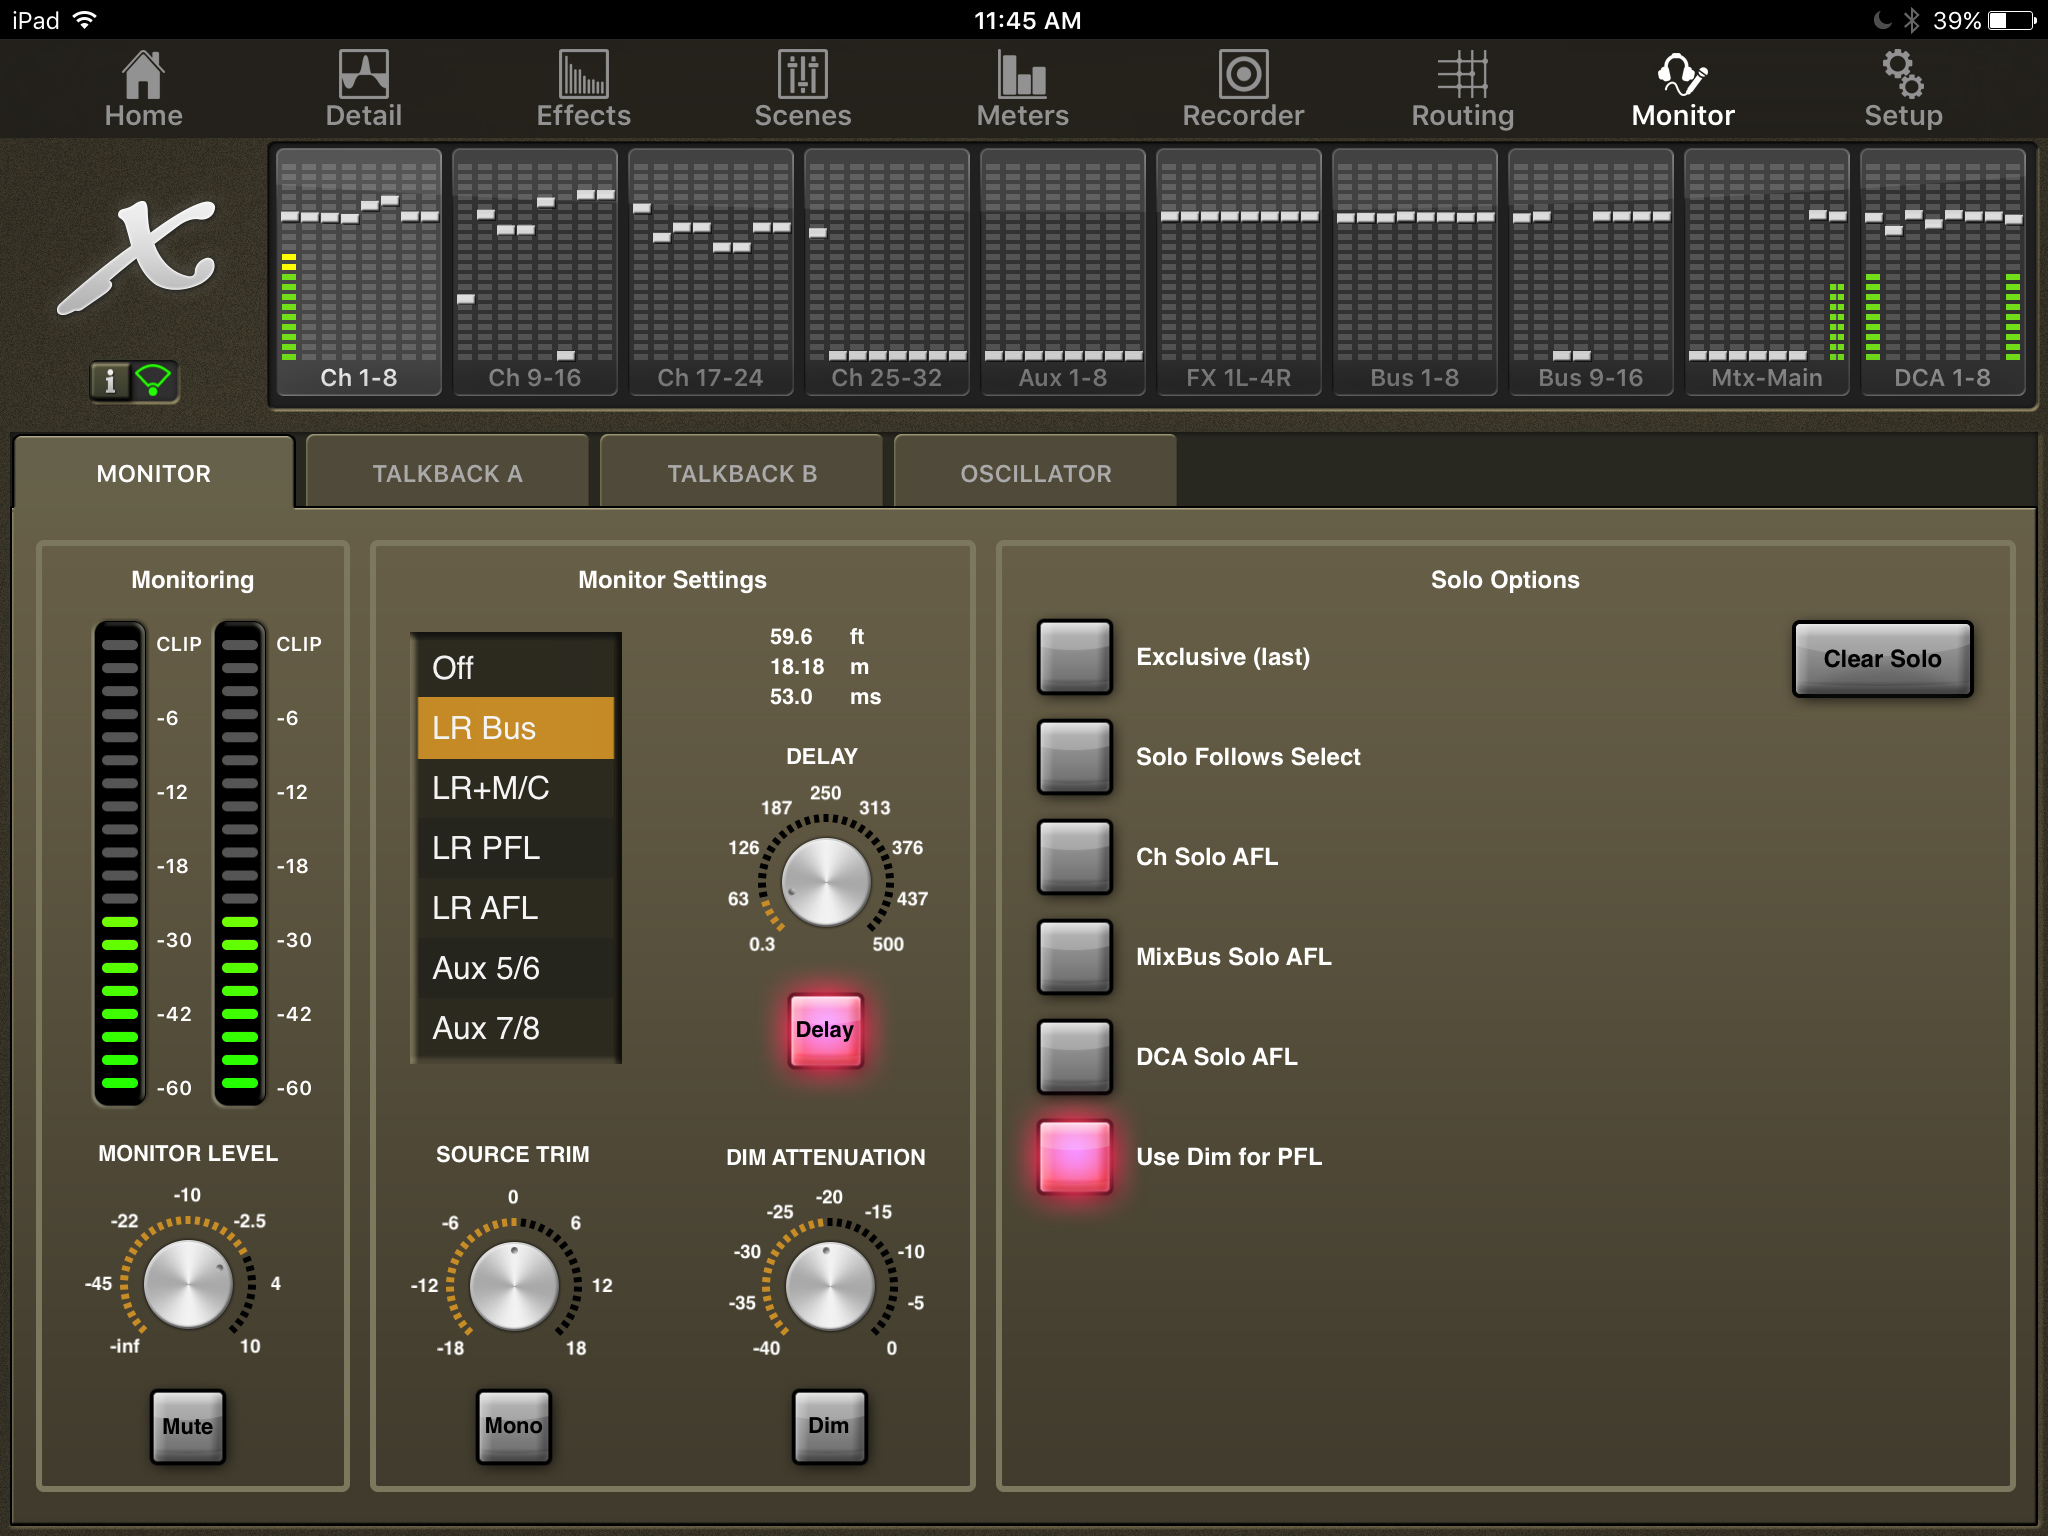
Here is the main section for the control of the monitor:
- Monitor Level – gives us the control over the output level of the monitor. If you are using a wireless IEM for your monitoring, you can use this for the volume or you could also use the IEM packs volume. We also have the ability to mute. Control allows for -∞ to +10dB.
- Monitor Settings allows us to pick where we want to source for our monitor.
- Off – When nothing is soloed, no audio will play in the monitor.
- LR Bus – Sources from the LR Bus
- LR+M/C – Sources from the LR Bus and the M/C Bus
- LR PFL – Sources from LR Bus in a Pre Fader Tap
- LR AFL – Sources from LR Bus in the After Fader Tap
- Aux 5/6 – Sources from Aux 5 & 6
- Aux 7/8 – Sources from Aux 7 & 8
- Source Trim – This adjustment allows us to control the overall level of the source that is selected in the monitor settings. This allows you to turn up/down the volume of the main mix, but leave the solo volume alone. Control allows for -18dB to +18dB.
- Mono – Sets the monitoring from stereo to mono
- Delay – This is a HUGE thing for me, this allows you to delay the monitor section to bring your monitor into time-alignment of the PA. This is useful for both near-fields at the FOH or your IEM/Headphones. Control allows for adjustment from 0.3ms to 500ms.
- Dim Attenuation – This is a control for turning down the monitor output controlled via the Talkback tab and the ‘Solo Options>Use Dim for PFL’. Control allows for adjustment from 0.0dB to -40dB.
- Solo Options:
- Exclusive (last) – When this is selected, only one channel will solo at a time.
- Solo Follows Select – When changing channels using the select button, the solo will follow to the current channel you are adjusting.
- Ch Solo AFL – Allows for an After Fader tap for the channel solo
- MixBus Solo AFL – Allows for an After Fader tap for the mixbus solo
- DCA Solo AFL – Allows for an After Fader tap for the channels that are assigned to the DCA that is soloed
- Use Dim for PFL – Turns down the output of the monitor by the level set in the ‘Dim Attenuation’ when soloing a channel in a Pre Fader tap.
- Clear Solo – Clears the currently selected solos.
X32-Mix Talkback A
Next, we have the talkback section. If using an iPad as your main work surface and you are not next to the physical console, investing in a cheap wireless microphone for your talkback mic might be worth it! Just plug it into the ‘Talkback’ XLR input and select the ‘External Mic In’ setting and you are ready to go!
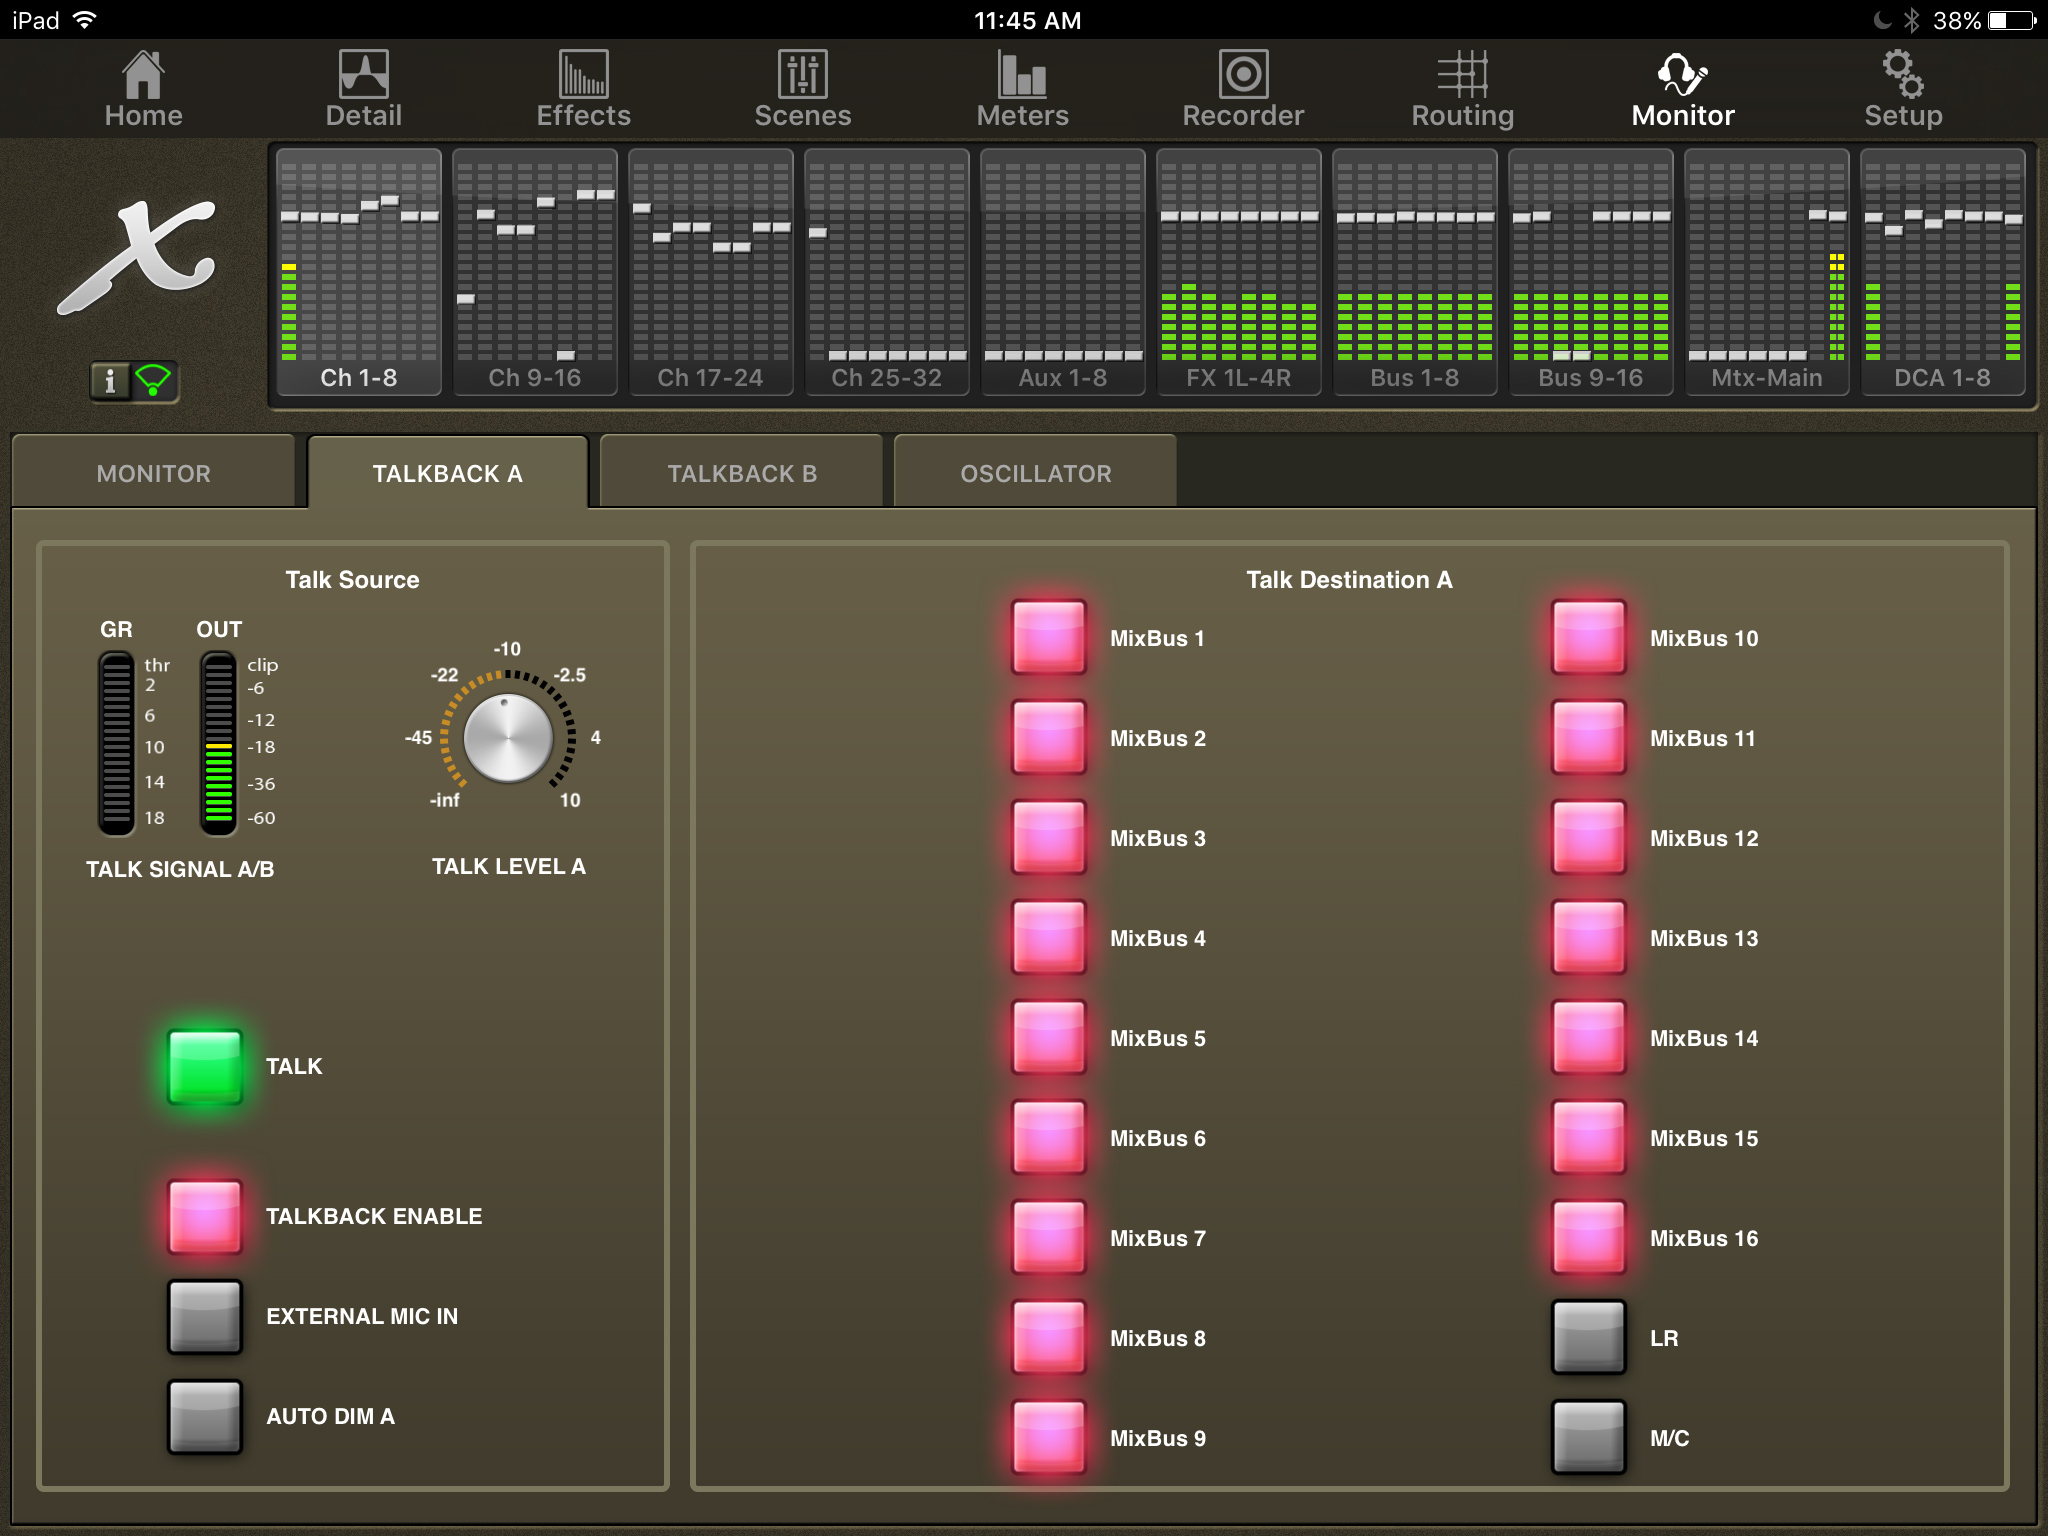
We have two talkback sections, Talkback A and Talkback B. Below you can see the talkback tab:
This gives us the following controls:
- Talk Level A – This is the level of the talkback into the destinations. Control allows for -∞ to +10dB.
- Talk – This button turns on and off the talkback.
- Talkback Enable – This enables the control of the talkback section.
- External Mic In – This gives the option to use the internal or external mic for the talkback.
- Auto Dim A – Turning this on, will attenuate the monitor of the X32 by the level set in the Monitor tab under ‘Dim Attenuation’.
- Talk Destination A – This allows you to select the destination of the talkback. you have the following options:
- Mixbus 1-16
- LR Bus
- M/C Bus
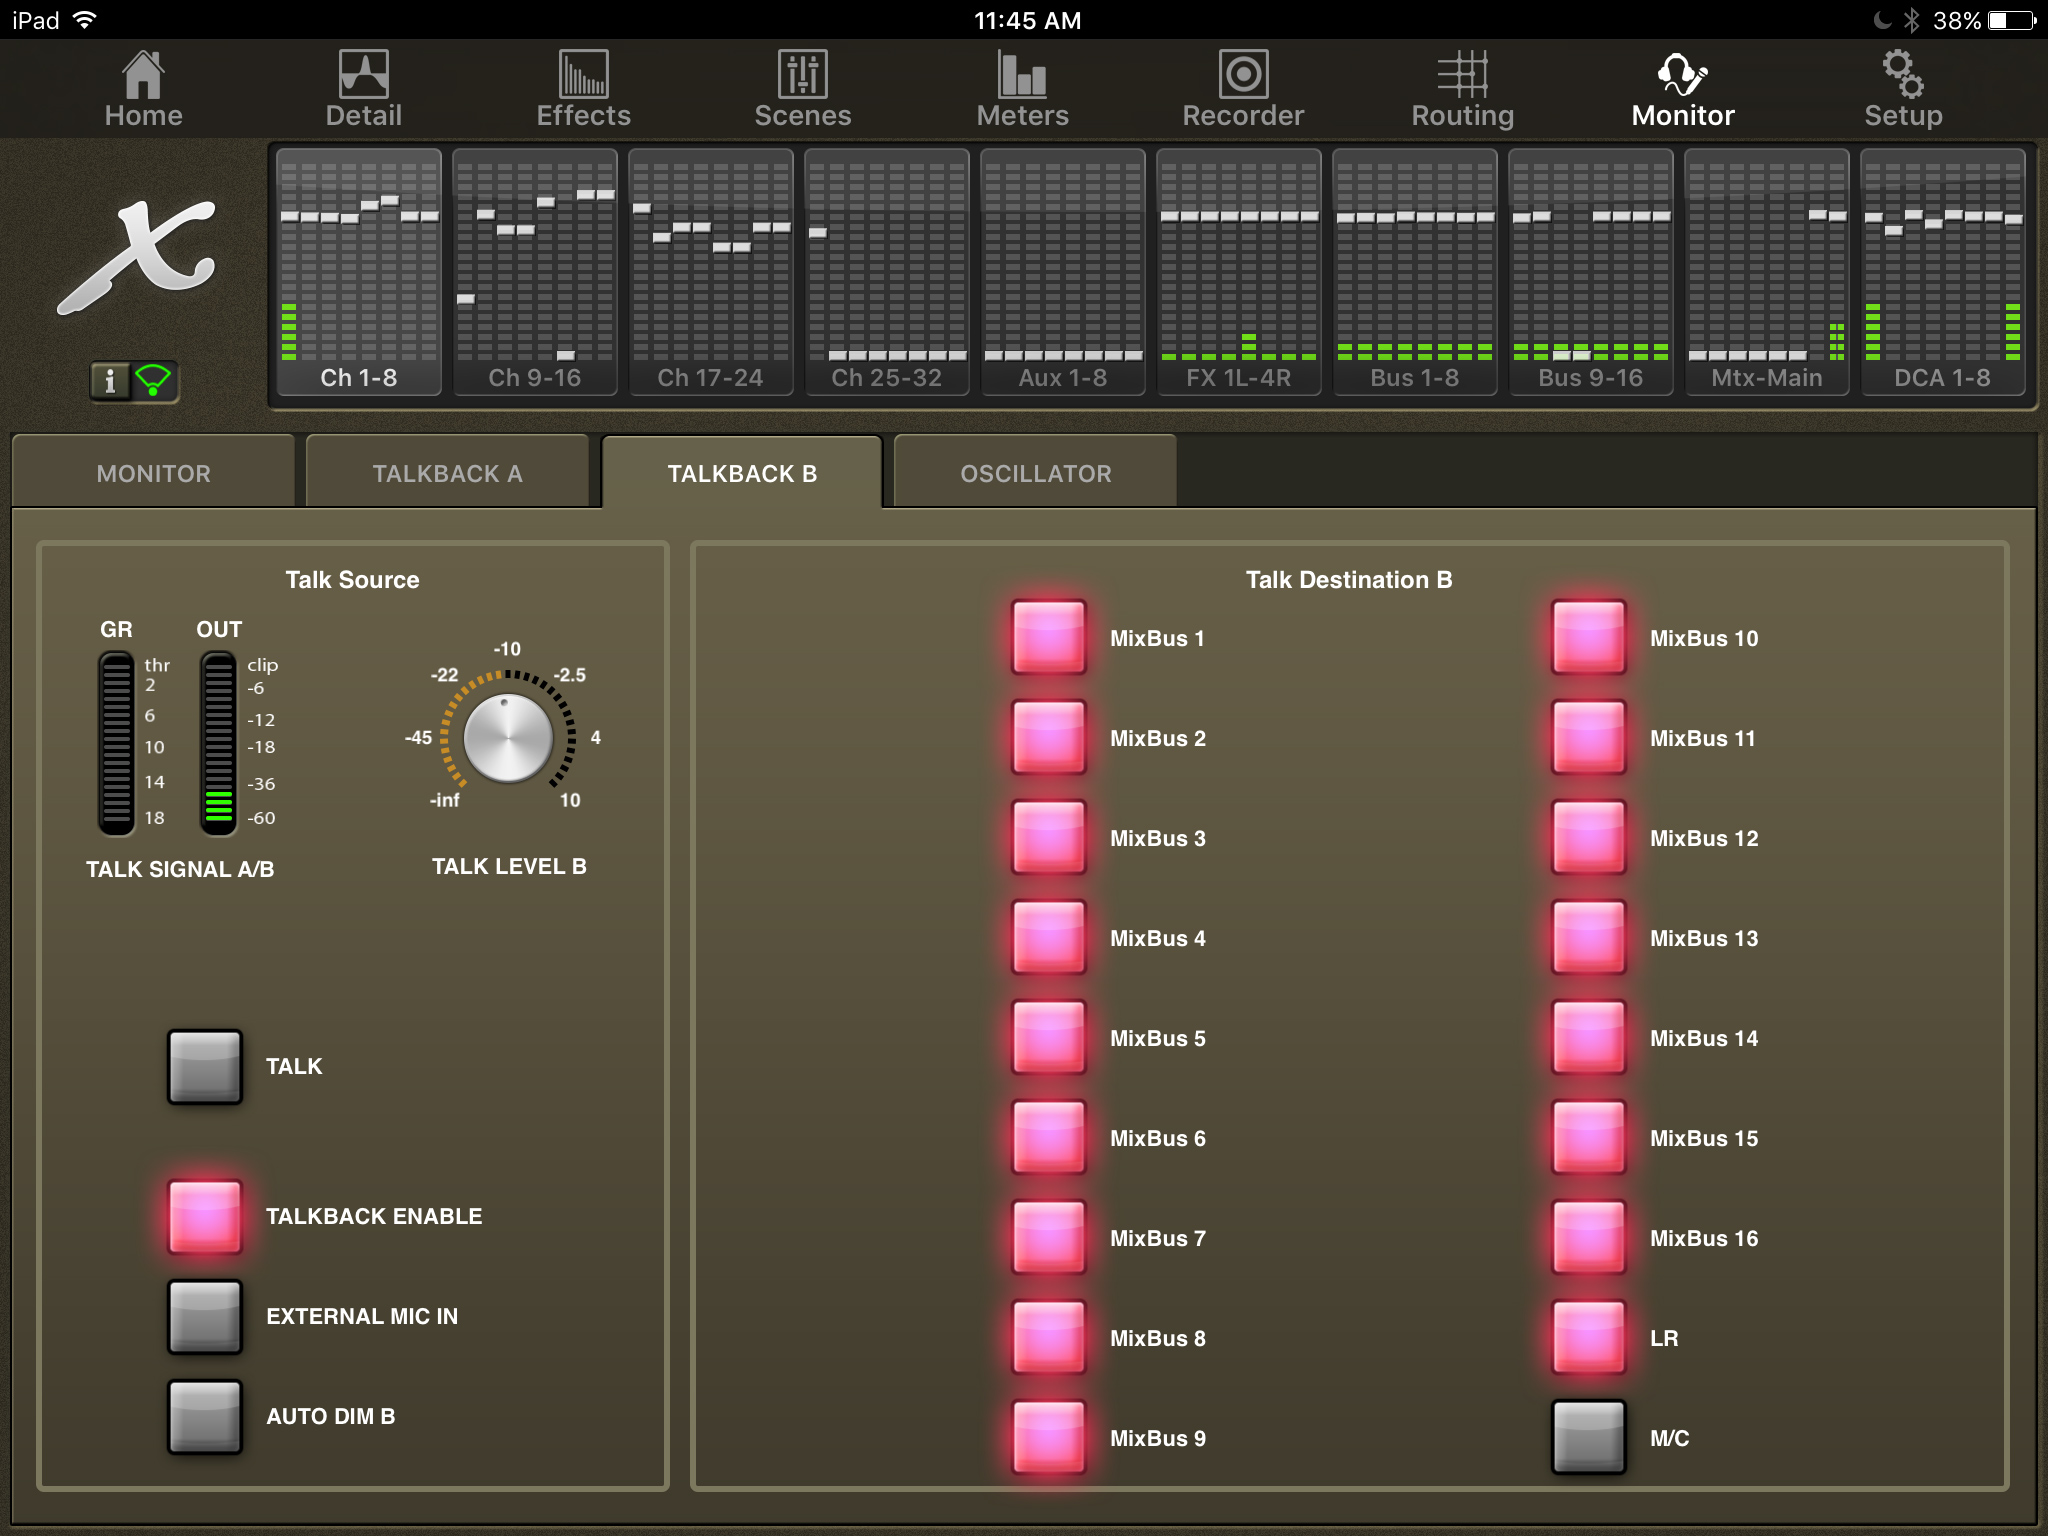
Talkback B
I personally like to have the Talkback A going to only the monitors (for me, typically Mixbus 1-12) and Talkback B going to the monitors and the main PA. This way I have the option to talk to the band if they are using IEM’s and they don’t have their headphones in.
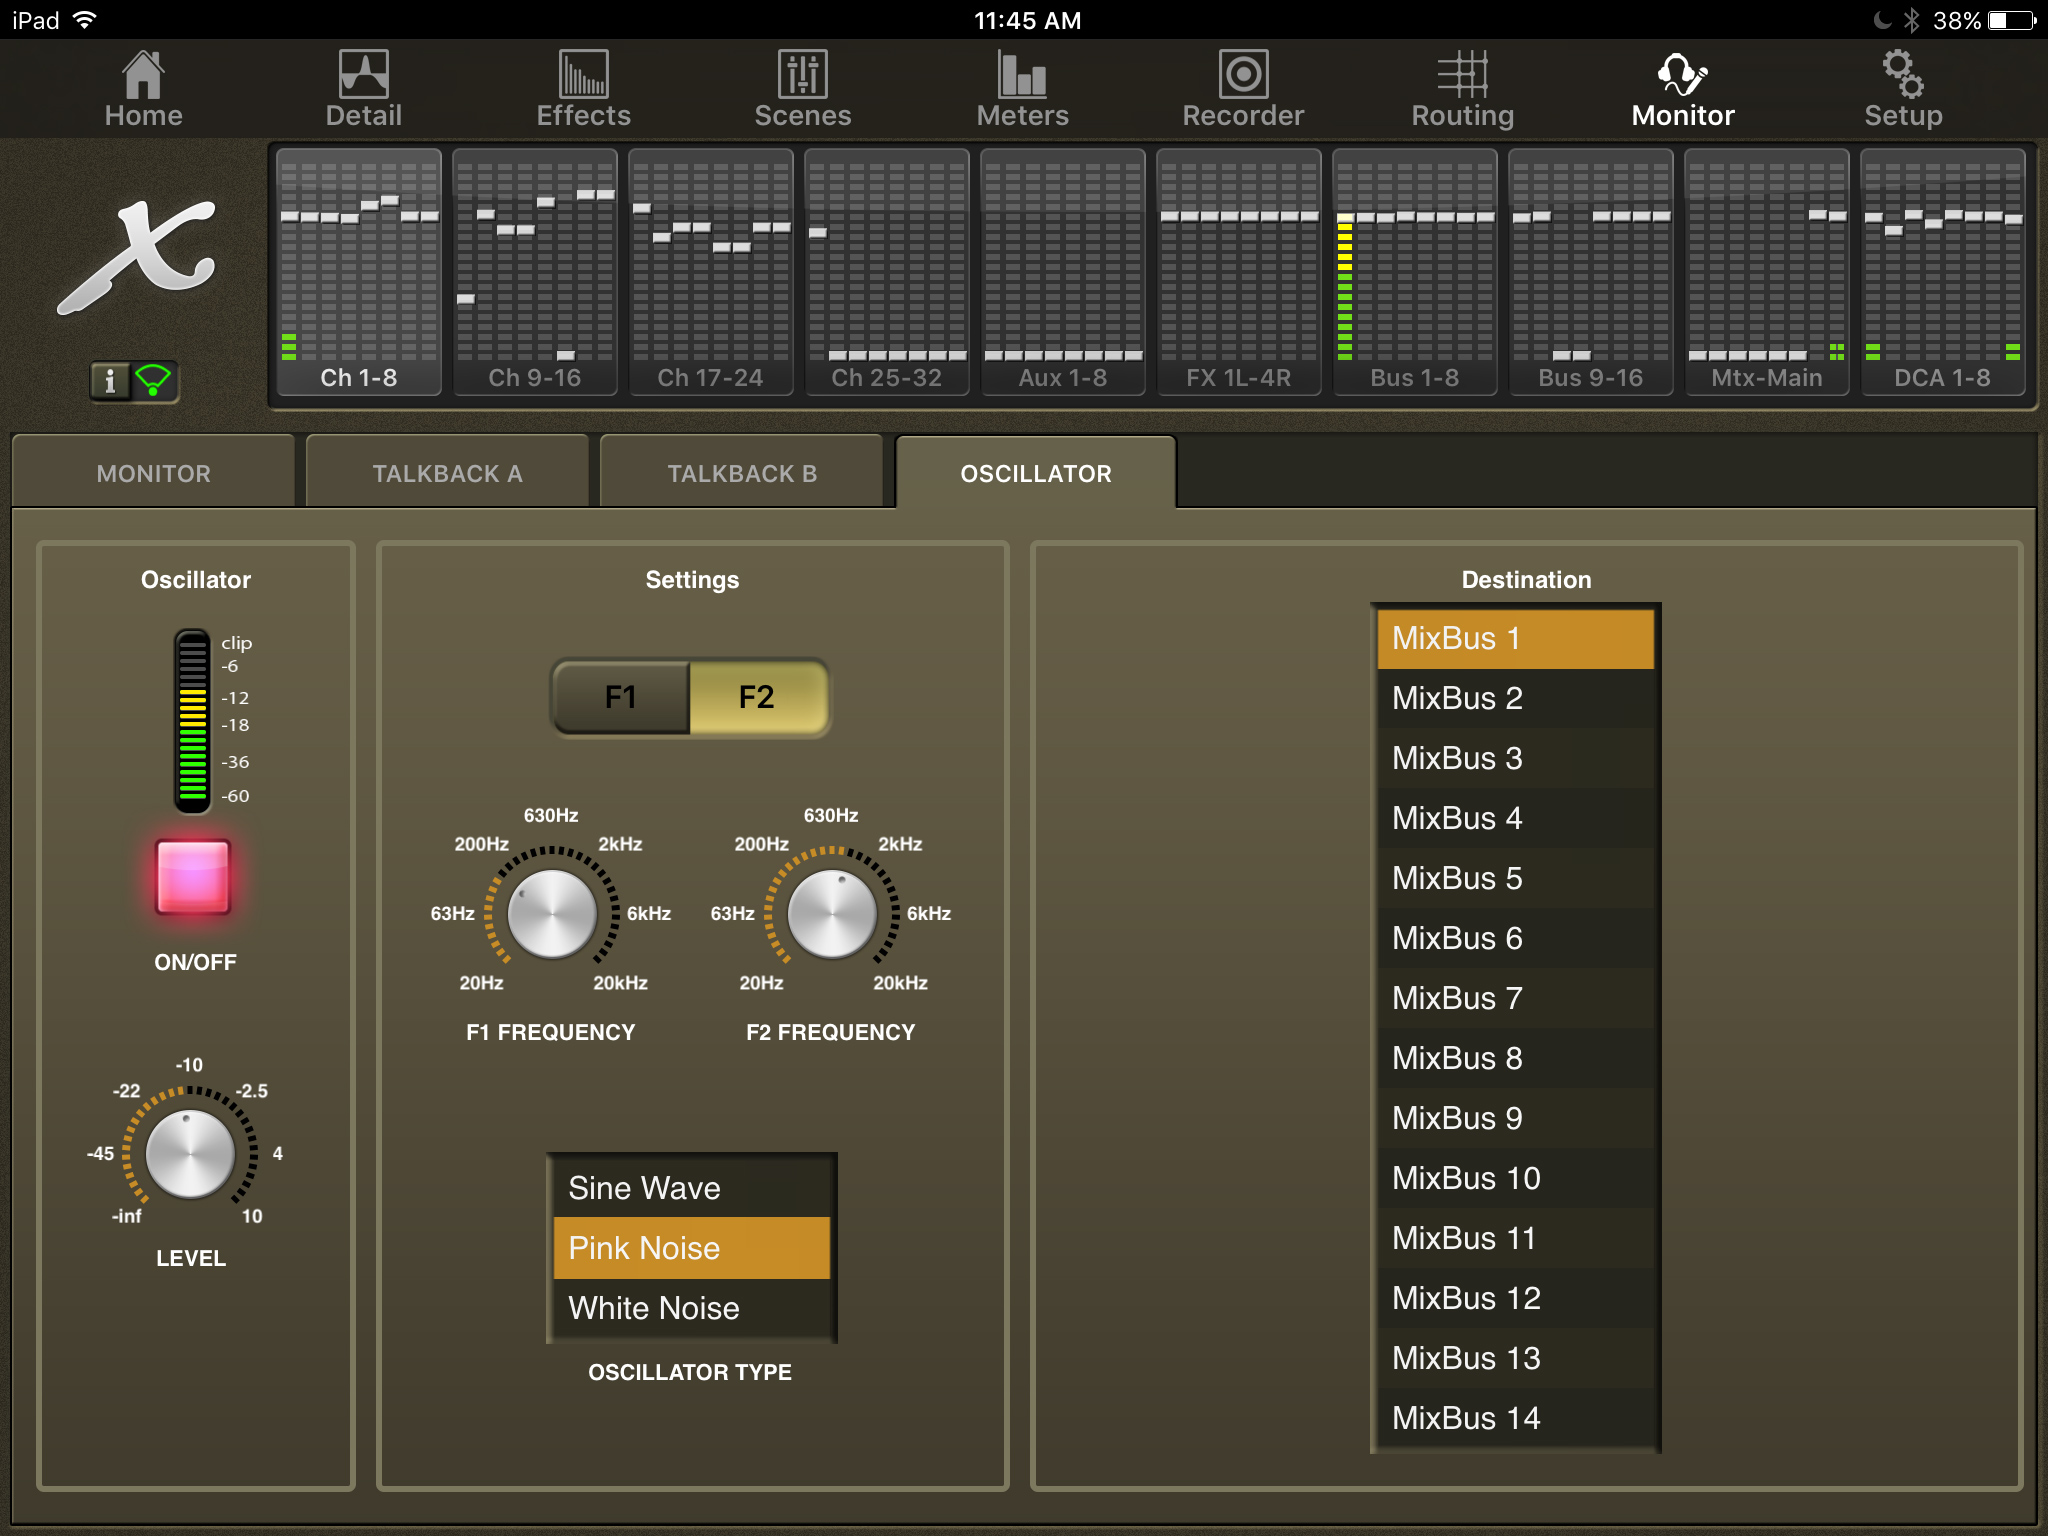
Oscillator
The Oscillator section is very useful for measuring a PA system or doing fine measurements of level.
Here are the controls that we have:
- On/Off – Turns the oscillator on or off
- Level – Sets the oscillator output level. Control allows for adjustment from -∞ to +10dB.
- Oscillator Type – Sets the type of audio being produced from the oscillator. Control allows for Sine Wave, Pink Noise and White Noise. (when tuning a system, using Pink Noise, when making specific level measurements use Pink Noise or a Sine Wave)
- F1 / F2 – Sets the Sine Wave Frequency
- F1 / F2 Frequency – Sets the cycle of the Sine Wave, control allows for 20Hz to 20kHz.
- Destination – Sets the destination of the Oscillator. Our destinations include:
- Mixbus 1-16
- Main L
- Main R
- Main L+R
- Main M/C
- Matrix 1-6
Next time!
That is all for this week’s X32-Mix App Tutorial Monitor Tab! Next time, we will finish out this series with the Settings tab of the X32-Mix App!
