I have seen and received a lot of questions about getting the X32 connected to a network to be able to use X32-Edit, X32-Mix, and X32-Q. Having the Behringer X32 and Midas M32 connected to a network will give a lot of flexibility that you wouldn’t have without it.
FYI, back in the day, it was called X-Control and Xi-Control!!
First let’s get one thing straight, while the iPhone, iPad and Android apps can ‘adjust’ the monitor mix, it cannot monitor or listen to this mix. You cannot listen to audio from the X32 through your phone.
Router, Switch, Cables?!
Before we get too far, we need to talk about the devices that we use to get our network going!
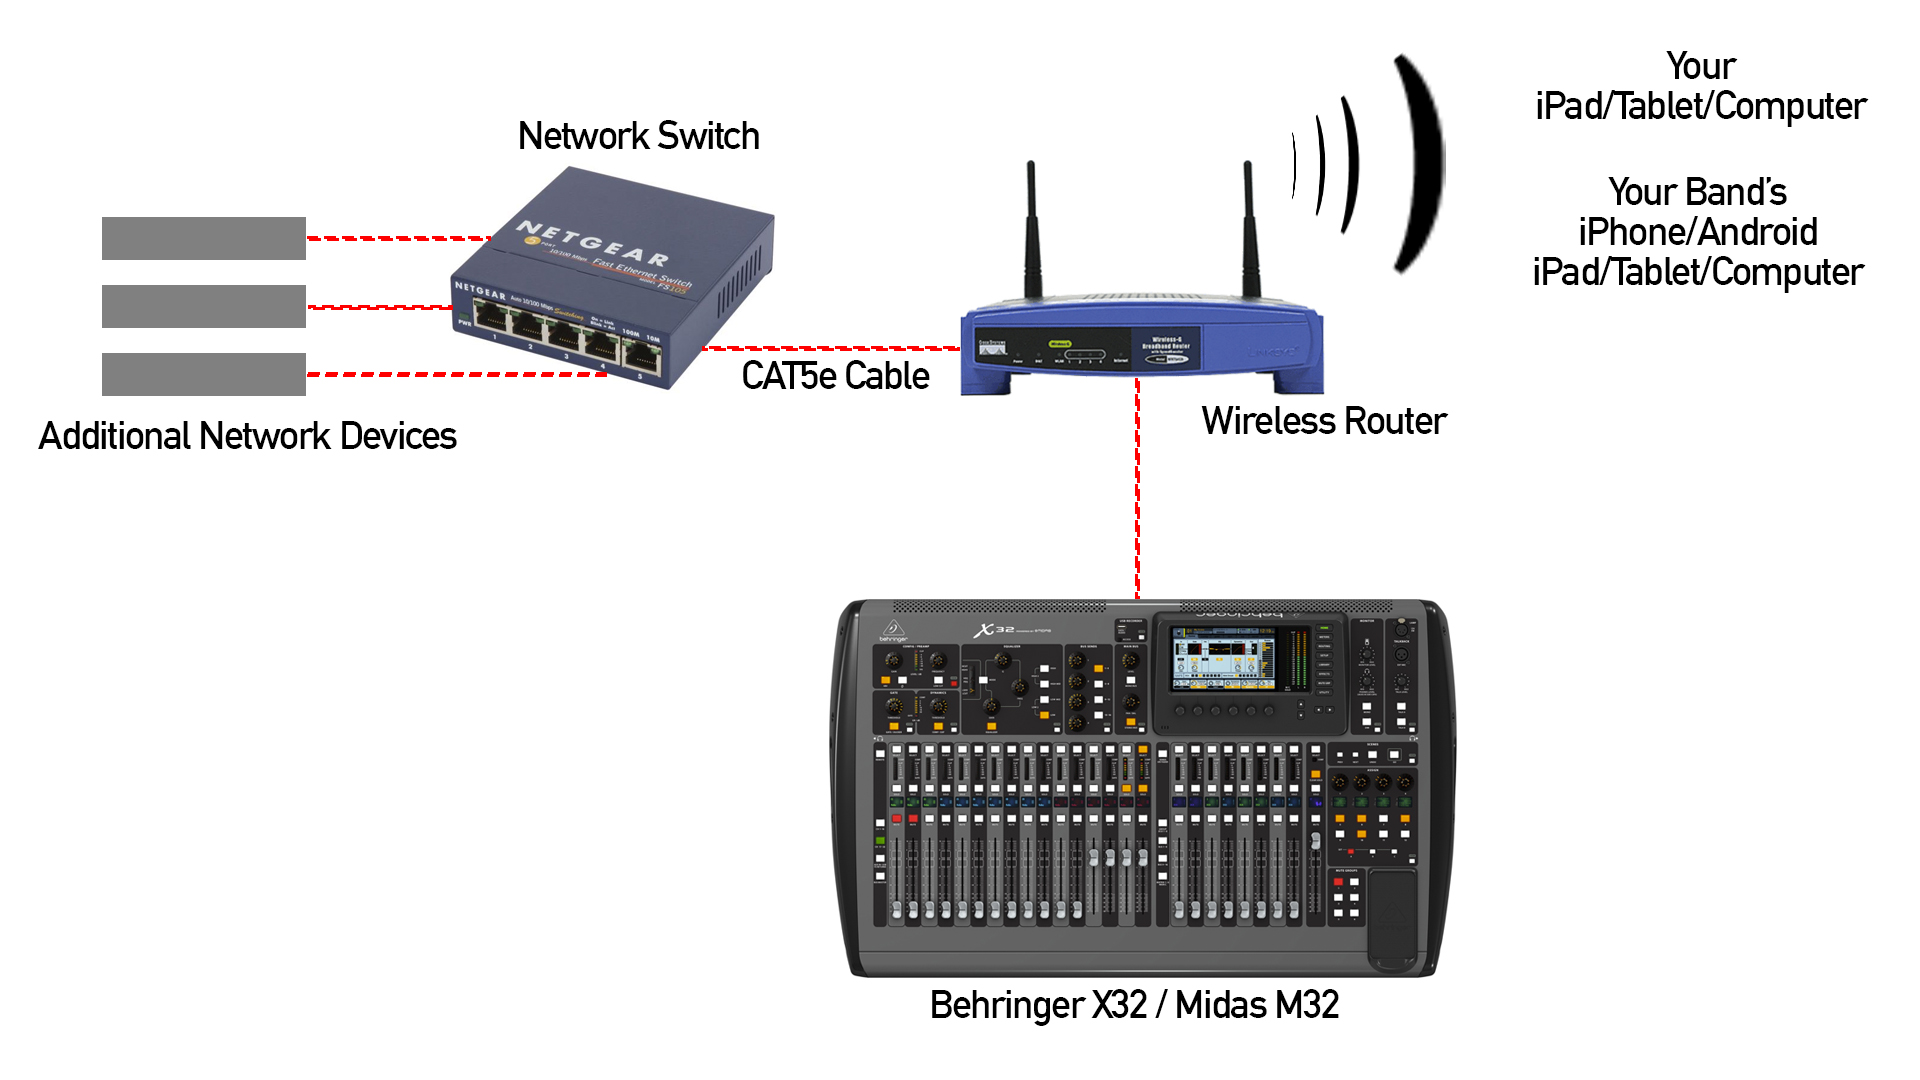
A network in the old days was only connected with network cables, what we refer to as CAT5e cables. A CAT5e cable stands for the type of network cable it is. With the X32 we can use CAT5, CAT5e, and CAT6 cables for the network interface.
A router is the device that gives out IP addresses to everything on the network and is the main brains of the network. We typically will find a ‘wireless router’ to not only allow physical connections with network cables but also allow wireless devices like phones or tablets to connect as well.
A network switch gives the ability to expand the physical network connections as your wireless router will have 4 LAN ports on it. If you wanted to add more ports to connect more devices, you would use the network switch.
A Primer on Networking
The network for the X32 is using the same technology as your computer or laptop. The most important part of the networking side of the X32 are the addresses. We call these IP Addresses. IP address stands for Internet Protocol Address, specifically IPv4, and is a numerical address for each device on a network.
The most common network addresses that we see are between the ranges of
- 10.0.0.0 – 10.255.255.255
- 192.168.0.0 – 192.168.255.255
The IP address range is set by your router, the most basic off the shelf routers will have an IP address itself of 192.168.0.1 or 192.168.1.1. For this example, I am going to use a router with an address of 192.168.1.1. Most of the routers that are in use out there will make a Class C network which will give 256 addresses. This leaves 253 IP Addresses available to use for the network. This is the breakdown of that:
- 192.168.1.0 – Network Name
- 192.168.1.1 – Router IP Address
- 192.168.1.2-192.168.1.254 – Available for Network Devices
- 192.168.1.255 – Broadcast Address
The X32 & M32 allow for 10 remote devices to be connected to it at the same time, so having a limit of 253 devices on your network should not be a problem. This is one reason you should ALWAYS have your network secured!
Subnet Mask is the next thing you need to know. This is also set by your router and is usually ‘255.255.255.0’.
Finding Your IP Address & Subnet Mask
So, now that you have had a refresher on IP Addresses, let’s go find them! Turn on your router that you are using and connect to your network with a device.
iPhone:
- Connect to your network
- Once connected
- Go to Settings>Wi-Fi & then press the (i) next to the network name
Mac
- Open System Preferences
- Click into Network and select Wi-Fi or Ethernet (whichever has the green circle)
- Press Advanced
- Tab to TCP/IP
Windows
- Open a Command Prompt
- type ‘ipconfig’ and press Enter
This will show the IP Address of your phone, Subnet Mask & Router IP Address
In this example they are:
- Router IP Address: 192.168.1.1
- Subnet Mask: 255.255.255.0
- iPhone Address: 192.168.1.2
Start Connecting!
Now that we know the base setup for the router we are using, we can get it connected to our X32/M32.
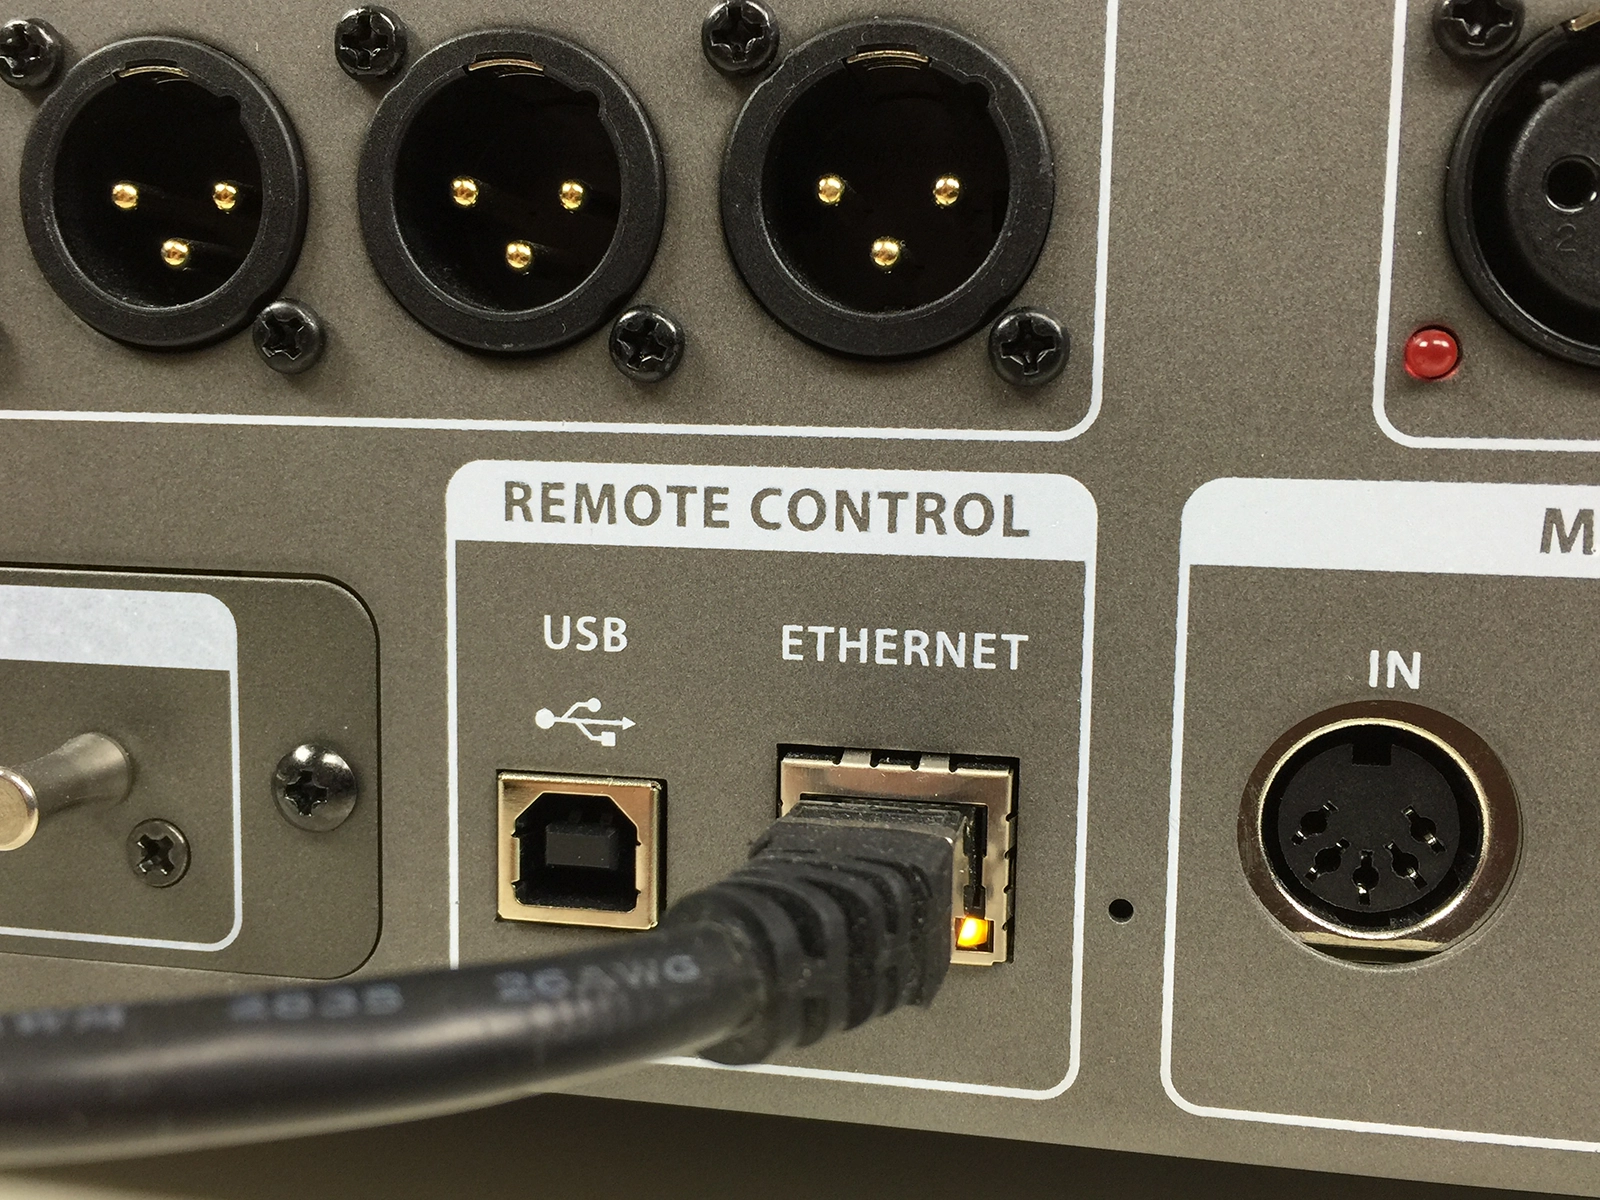
Connect the X32 with UTP CAT5e or STP CAT5e cable from the wireless router’s LAN ports to the ‘Ethernet’ jack in the ‘Remote Control’ section on the back of the console.
LAN NOT WAN!!!
There IS a difference!!! When you look at the back of your router, you will see typically one WAN connector and 1-8 LAN connectors. WAN stands for ‘wide area network’ and is for connecting to an external cable company’s fiber network. LAN stands for ‘local area network’ and is made for connecting your devices to.
You WILL have problems if you connect your X32 to the WAN connection, so make sure you connect the X32 to the LAN connection on your router!
Continuing…
Connect the X32 with a CAT5 or CAT5e cable to the router’s LAN port and plug that cable into the ‘Ethernet’ jack in the ‘Remote Control’ section on the back of the console.
NOTE: You can use UTP (unshielded twisted pair) or STP (shielded twisted pair) CAT5e or CAT5 cable for this connection. There is no need for a shielded cable like the AES50 ports. Also, as the X32/M32’s Ethernet port is a 100Base-T connection, there is no need for a gigabit router or CAT6 cables.
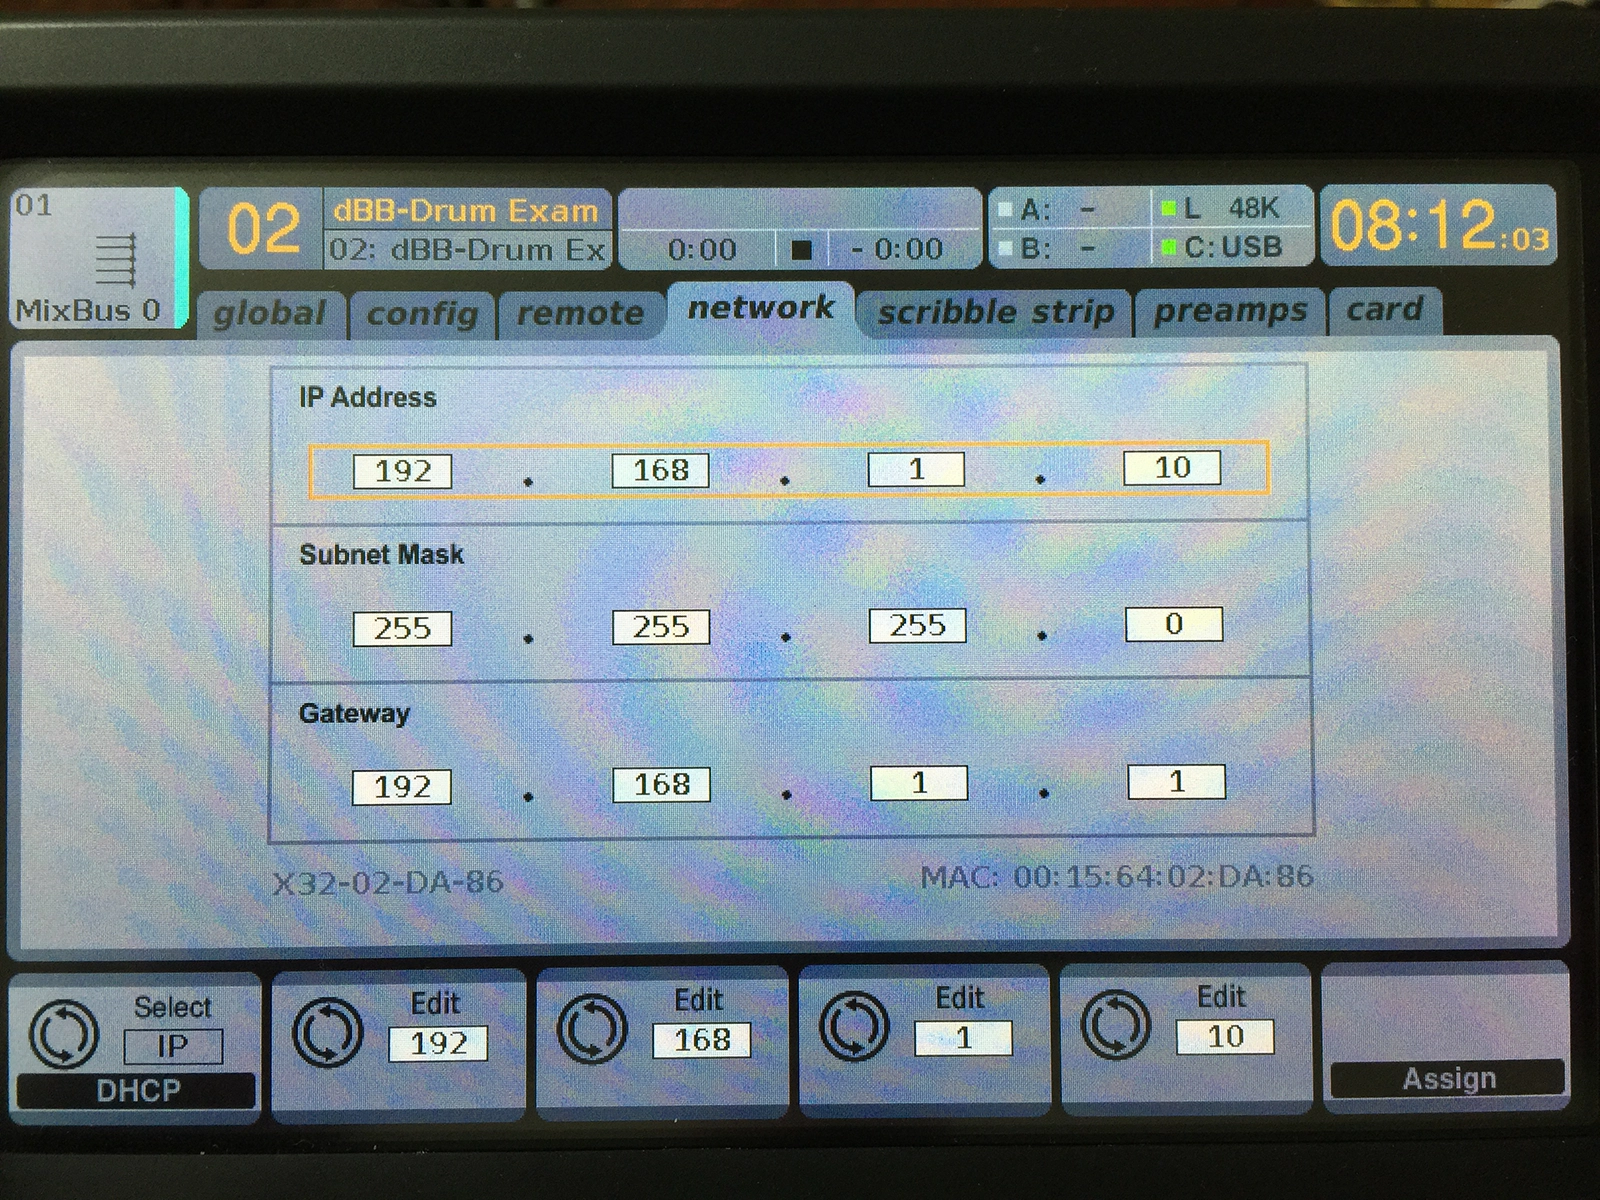
After the network cable is connected, press the ‘setup’ button and tab over to the ‘network’ tab. Once there choose an open IP address on the network for the X32 and put that and the other information into the addresses.
In my example I am using the following:
- IP Address: 192.168.1.10
- Subnet Mask: 255.255.255.0
- Gateway: 192.168.1.1
Ready for Connections!
At this point, your Behringer X32 or Midas M32 is ready for remote connection with any of the approved apps like X32-Edit, M32-Edit, X32-Mix (iPad), M32-Mix (iPad), X32-Q, M32-Q, Mixing Station.
I would suggest using a higher IP address for the X32 itself. That way the possibility of the router giving out a duplicate IP address to another device on the network is quite low. I will typically use an address of 192.168.1.201 or something in the x.x.x.200-254 range.
What About a Direct Connection?
Now someone is going to bring up the question of what about a direct connection from my computer to my X32?! Technically, yes you can have a direct connection without the router. To do this you can take a CAT5e cable direct from the computer to the X32 (older computers may require a CAT5e Crossover cable. I have been able to connect with a normal cable with my MacBook Pro and MacBook Air). You would need to manually set the IP address inside of your Mac, Windows, or Linux device as such:
Computer IP Information:
- Computer IP Address: 192.168.1.1
- Subnet Mask: 255.255.255.0
- Router IP Address: 192.168.1.2
X32/M32 IP Information:
- Console IP Address: 192.168.1.2
- Subnet Mask: 255.255.255.0
- Router IP Address: 192.168.1.1
While this may seem easier, manually setting those numbers on your computer will get tedious. This also limits you to one connection.
A Bunch of Tips
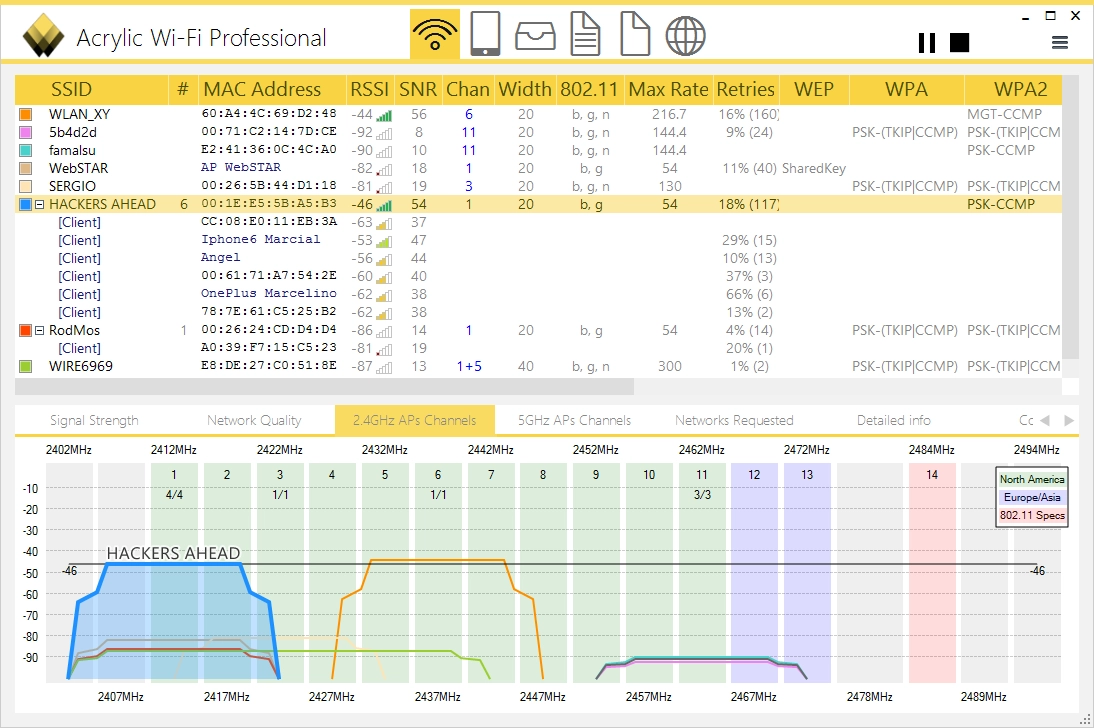
GET A WIFI SCANNING PROGRAM!!!!!!! This is probably the biggest thing that will help you in your setup especially if you are traveling with the X32/M32. A Wi-Fi scanner program like Acrylic WiFi Professional (or the free version Acrylic WiFi Home) will scan the 2.4GHz and 5GHz spectrum and display the Wi-Fi networks that are present, their amplitudes, and what channels they are on. This will help you specifically choose your wireless network channel to give better wireless connectivity.
DD-WRT Firmware
DD-WRT was first created as an open source firmware upgrade for the ever popular Linksys WRT54G wireless router. DD-WRT was a free download that could be installed onto the router for expanded functionality for the router including boosting Wi-Fi signal transmission power. DD-WRT is has expanded to be available for a number of different Wi-Fi devices and will expand the functionality of any router which it supports.
Check it out at www.dd-wrt.com.
Use 5GHz When Possible
The 2.4GHz spectrum is very crowded, I would recommend finding a router that has 5GHz as well as 2.4GHz. If you are in direct sight of the router, 5GHz will work well but will not go through many walls or rows of people. 2.4GHz while more crowded will penetrate through more rows of people and walls. But having the option for both is always a good idea.
Use External Antenna’s When Possible
You do it for your wireless receivers and IEM’s, why stop there! Getting a set of professional Wi-Fi antennae that can connect to your router can not only give you a better line of site to the mix position but also can boost the receive and transmit signal of your router. Make sure to use really good low loss coax like LMR400 or RG-8X with short lengths and quality connectors between the router and the wireless antenna. The higher in frequency you go with RF, the less forgiving it is with finicky connections and cheap coax, not to mention the loss is significantly higher at 2.4GHz and 5GHz.
Also, using directional antennae can also help boost your signal if mixing FOH from an iPad with your Rackmounted X32/M32 onstage.
A few good products that would work well are:
- WA5VJB 850-6500MHz Log Periodic ($20 each Feb. 2019)
- WA5VJB 2100-11000MHz Log Periodic ($9 each Feb. 2019)
- WA5VJB 2.4-2.48GHz Quad Patch ($12 each Feb. 2019)
- WA5VJB 5.8GHz Quad Patch ($8 each Feb. 2019)
- Comet Antennas SF-245R ($60 each Dec. 2016)
PLEASE PLEASE PLEASE Secure Your Network!
Please…. Secure your Wi-Fi network! Also, please do not use WEP as the security protocol. Just Google “WEP Network Hacking” and enjoy learning how insecure it really is!
Here is the list of security protocols currently out there (Dec 2016) ordered best to worst:
- WPA2 + AES
- WPA + AES
- WPA + TKIP/AES
- WPA + TKIP
- WEP
- Open Network (AKA NO SECURITY!)
Lastly, don’t title your Wi-Fi network something like Soundboard, you are just ASKING for trouble. Along with the Wi-Fi network name, or SSID, routers have the option to not transmit the SSID. The pro of hiding the SSID is that bystanders will not see the Wi-Fi network pop up when they are looking for a Wi-Fi network to connect to. The con is that you have to manually type the network name and password, this may or may not be a turnoff. I know that for my uses inside of a church, having to manually help the band connect their phones to the console sounds like a bit too much work. I personally would rather title the network something obscure like “FBI Surveillance Van” 😉
Static IP Addresses
There is a lot of people who will suggest using Static IP addresses for your devices. This is basically where your wireless device will set its’ own IP address manually, rather than having the router assign one to that wireless device. There are pros to this like having a more rugged network and having devices not changing their IP addresses. However, this is getting a bit more advanced with networking and is really outside the scope of what I am trying to suggest with this post. There are some major cons with using static IP addresses like #1 needing to train your musicians how to set their device to a manual IP, and #2 when you have a lot of volunteers, you have a LOT of devices so the possibility of accidentally having two devices with the SAME IP address goes a lot higher.
There are some major cons that I see with using static IP addresses like #1 needing to train your musicians how to set their device to a manual IP, and #2 when you have a lot of volunteers, you have a LOT of devices so the possibility of accidentally having two devices with the SAME IP address goes a lot higher.
If you have a solid crew/band ALWAYS working the same setup (like a well-planned tour) using static IP addresses would work wonderfully as each person’s device is known and teaching a handful of people how to do it once isn’t all that bad.
My honest suggestion is to have the router do the work of dishing out IP addresses. Plug your wireless router into the same power conditioner as the X32 so that when you power your system on, you power your router on at the same time. This will restart your network every time you turn on the X32 which will refresh your IP addresses on the network.
Know WHO is on your network!
This goes hand in hand with the security of your network AND the last section that we just went over about static IP addresses. Know who you give out the password of this network! This is your network for your sound board, NOT for accessing the internet. In fact, I don’t EVER attach my audio console network to the internet or the church’s network. I want this network to be isolated. Why? Because if ANYTHING goes wrong, who is the person to blame? Think of giving out the password of this network as letting someone come play with the faders on your board. If you don’t trust them touching the physical audio console, don’t trust them on your network.
That is all!
Thanks so much for reading through this, if you have any suggestions on ideas to add to this post, please let me know. I really want it to be a resource for people who are setting up their X32 network for the first time.